

Tips & Tricks
Helpful hints for happy pop-up camping
- The most important set-up/tear-down reminder
- Rafter pole set-up trick
- Lighting the fridge without frustration
- Fridge on 12V warning
- Awning set-up
- Awning warning
- Powered roof vent cleaning
- Air conditioner decompression
- Filling the cassette toilet
- Easy-sliding bed rails
- Storing metal objects
- Re-hitching the camper to the tow vehicle
For problem-solving help please see Troubleshooting.
Make ABSOLUTELY SURE the roof is cranked up completely before sliding the beds in or out. If the roof is not up all the way there will be slack on the tent. When a bed is slid back into the camper box the tent could be in the way of the bed slide and the bed slide will most likely tear the tent.
"When would that ever happen?" --The most common occurrence is when someone needs to get an item from inside the camper and they're in a hurry. They crank up the camper just enough to get one of the beds out of the way and get the item they're looking for.
Since the roof isn't up all the way and the canvas was tucked in the last time the roof was cranked down, the canvas now has a chance to flop down onto the tables or dinettes. Once the bed is pushed (shoved?) back in the bed rails catch the tent that's in the way and stretch or tear the canvas/vinyl.
During set-up, when pushing the bunk-end rafter pole into place, rather than push against your own weight to hook the rafter pole to the ceiling hook, use the plastic rail (that the valance attaches to) for leverage. Squeeze the rafter pole and white plastic towards each other with your hand until the rafter pole attaches to the ceiling hook.
Lighting the fridge on propane can be frustrating. Here's the trick: push the igniter twice quickly (instead of just once every several seconds).
What's happening: when you push the gas knob down to release gas into the lighting area and then push the igniter the spark ignites the gas. However, there is already so much gas in the area that the buildup of gas ignites and "pops" as the air comes rushing back to fill the vacuum created by the mini-explosion. This "pop" also extinguishes any flame that may have been started with the first igniter push.
How two igniter clicks solves the problem: By pushing the igniter twice the first spark ignites the excess gas (and you may hear the tell-tale "pop") but the second spark lights the new gas that's come in to the chamber. By then the air that was consumed with the first ignition has come back into the area and will sustain the new flame created by the second push of the igniter
The 12V operation for the fridge (the red switch) should be used only when the camper is hooked up to the tow vehicle's wiring plug, the tow vehicle has a hot lead/charging circuit, and the tow vehicle's engine is running.
The tow vehicle's alternator has enough power to run the fridge continuously. A 12V deep-cycle marine battery (without being recharged by an alternator or battery charger) will run the fridge (poorly) for about 6 or 7 hours before the battery is completely dead. Thus, the 12V should be only an "on the road" option for the fridge.
The easiest way to set-up the awning:
- Raise the roof half-way (so you can still reach the awning without a stool, chair, or ladder).
- Un-zip the awning bag and unroll the awning.
- Set the vertical awning poles on the ground but do not extend them yet.
- Set-up the horizontal awning poles (with proper tension on the awning top).
- Attach guy-wires to the front corners of the awning yoke.
- Now extend the vertical awning poles (position them towards the camper about a foot so the awning has room to expand as you raise the roof the rest of the way).
- Raise the roof the rest of the way.
- Stake the guy-wires to the ground.
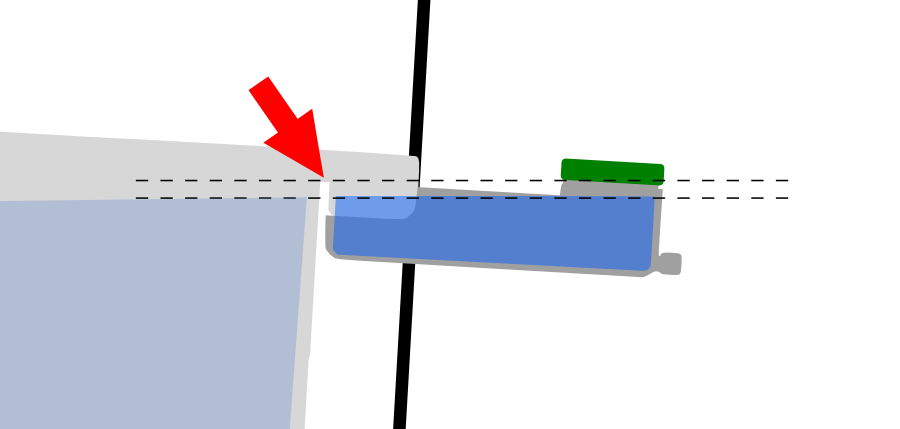
The awning must be staked down every time it is set up. It does not take much wind to lift the awning. When the awning flips up poles may break off from the awning yoke and either awning poles or the yoke could end up on the camper roof or on someone's head.
We have seen holes in many, many camper roofs from awnings learning to fly. Please tether the awning to something heavy or secure even if there is no wind at the moment. Your roof and awning poles will thank you.
Dust and dirt can collect on the screen of the powered roof vent. When you fold down the camper this dirt has easy access to the canvas. Cleaning dirt off the interior of a pop-up tent is not as easy as cleaning the exterior of the tent, so wipe the screen with a damp washcloth or paper towel before tear-down to prevent the canvas from getting dirty in the first place.
The screen can also be removed for cleaning. On some models a handful of screws need to be removed to remove the screen but on most Flagstaff models the screen pops off from the base of the powered roof vent (look for the thumb-hold to help pop the vent loose).
With the screen removed the underside of the fan blades can also be wiped off in the event of excess dirt and dust buildup. The topside of the fan blades can be cleaned by opening the vent completely and using a ladder to reach the top of the vent from the outside of the trailer.
If the air conditioner has been running for any length of time and you turn it off, make sure you wait 5-10 minutes before turning the air conditioner back on. The A/C needs time to decompress from running the first time or else it will probably blow a circuit breaker trying to start too soon the second time.
Most roads have a slight curvature to allow rain to quickly drain from the street. If you park the camper on the side of the road the camper will be at an angle due to this curvature.

Road curvature
The arm that swings out to fill the cassette toilet creates a p-trap. If the camper isn't level this p-trap could be above the level of the opening where you fill up the cassette fresh-water tank. Some water may go into the tank because of the pressure from the hose but most of the water will come back towards you and onto the ground.
P-trap height issue if the camper is not level
If the camper is level this problem is avoided completely and water will fill up and over the p-trap and into the cassette's fresh water tank as it should.
Paraffin wax (available at grocery stores) rubbed on the bed rails keeps them sliding smoothly.
Also, the bed is attached to the bed rails by six bolts. Even though the bolts have lock-nuts they can loosen up over time. This allows the bed to sag and scrape the weather stripping on the camper box more than necessary. Tightening up the six bolts on each bed makes the bed slide more smoothly.
Metal toolboxes, support poles, the grill and grill rack, metal coolers, etc. on the linoleum floor may damage the floor as the camper travels down the road. Use carpet or cardboard to protect the floor when hauling metal objects.
Note: support poles should be placed under the mattresses for secure stowage during tear-down. But, in the event you forget to put the poles away and the camper is already down, don't place the poles directly on the linoleum floor.
Sometimes locking down the coupler's ball clamp can be tricky. This has everything to do with the position of the ball in relation to the coupler after you've cranked down the tongue onto the ball hitch.
After cranking down the tongue onto the ball, if the ball ends up in the front part of the coupler then locking down the ball clamp is easy (because the ball clamp lever is only moving the ball clamp up to the ball).
If the ball ends up in the back end of the coupler then locking down the ball clamp is quite difficult because the ball clamp lever is trying to push the entire camper backward so the front part of the coupler will meet up with the ball!
Solution: if the ball clamp lever won't lock down easily simply push the camper away from the tow vehicle to move the ball to the front of the coupler.
The easiest way to do this:
- Put your back against the front panel of the camper.
- Place one foot on the bumper of your tow vehicle (and grab the dolly jack for support).
- Extend your leg until you feel the ball move into the front of the coupler.
- Lock down the ball clamp.
The other way to do this:
- Start the tow vehicle's engine.
- Pull the tow vehicle forward 1-2".
- Lock down the ball clamp.
Here's two more pages of suggestions:
Caulking/Covering - keep your camper safe from water and the sun
Battery Tips - pointers for a happy and healthy battery
Privacy © 2009-2024 Roberts Sales. All rights reserved.